외부 API를 사용하는 방법을 연습해보자
SD3(Stable Diffusion3)는 요즘 자주 사용되는 멀티모달 AI기술이다 프롬프트에 입력한 것을 이미지로 바꿔주는데 현재
https://stability.ai/
위 사이트에 들어가면 api를 제공해 준다.

Get Started with API
api를 사용하기에 앞서 일단 회원가입을 해준다 google계정으로 만들면 간단하다
회원가입은 api를 사용하기 위한 authoriztion 키를 얻기 위함이다.
위의 배너에서 get started with api 버튼을 클릭하자 아래로 내려가면
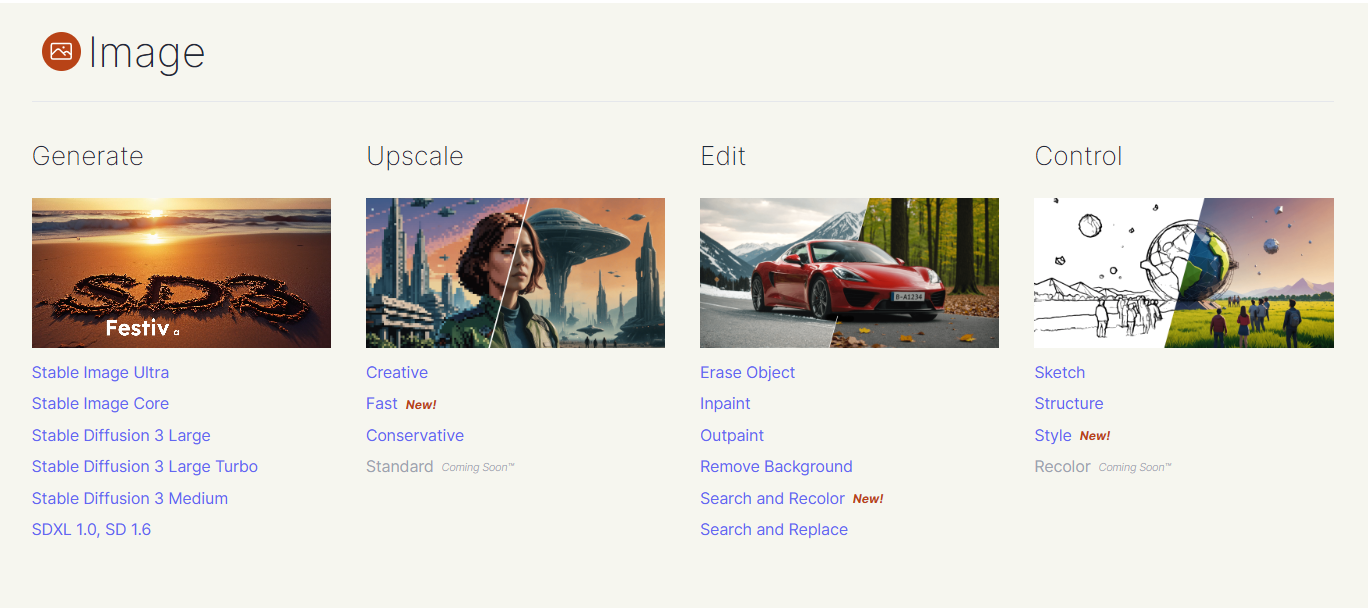
생성 업스케일 편집 등등 다양한 모델이 존재하는데 이중 generate의 모델 골라보자
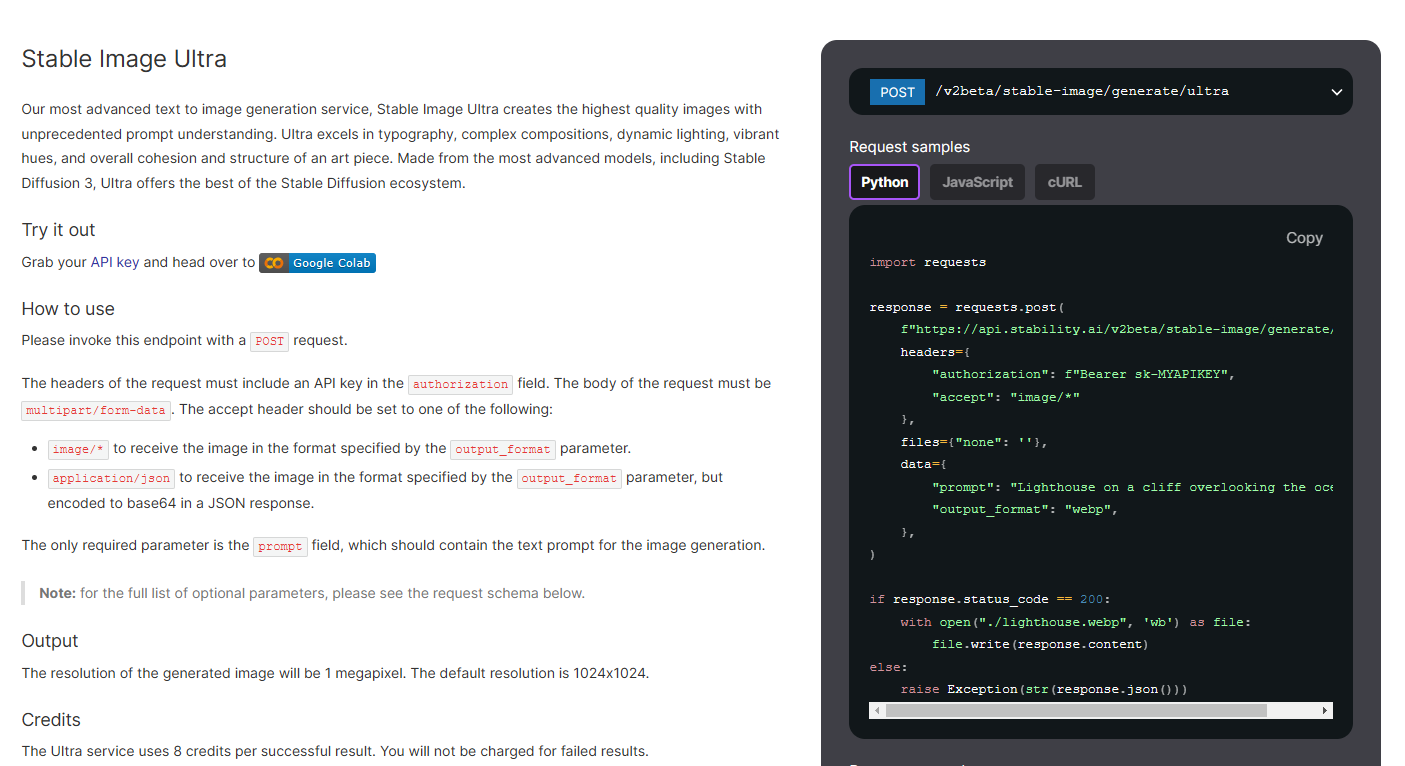
how to use가 보이지만 외부 API를 처음 사용해본다면 당황할 수 있다 특히 오른쪽 코드 예시를 보고 어떻게 사용하는지 어떻게 api를 보내는지 막막 할수도 있다.
이 부분을 한번 FastAPI를 이용해서 웹 rest api로 구현해 보자
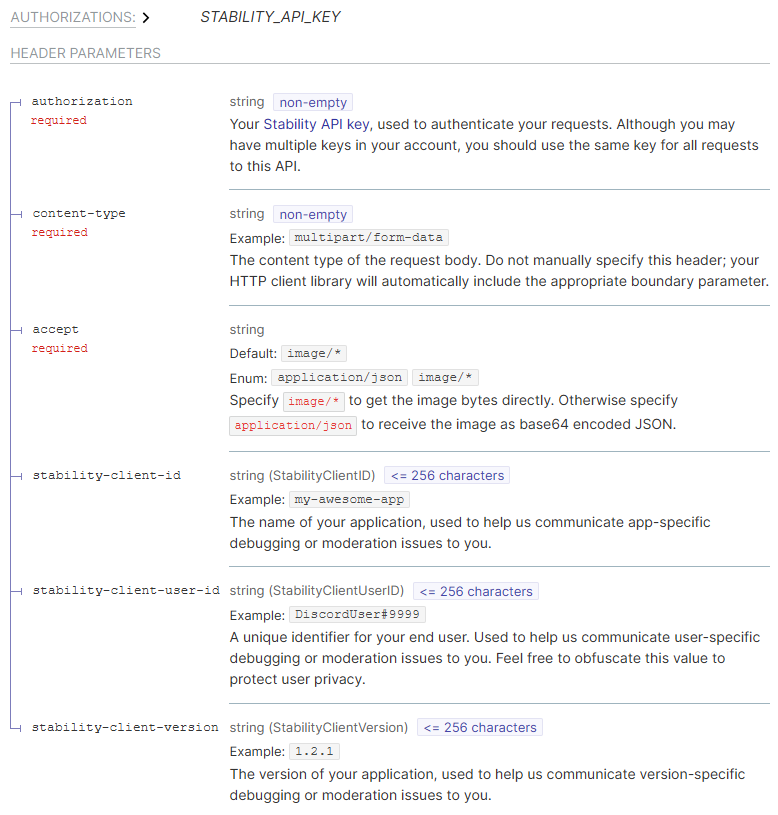
Request Head
우선 request head 부분을 보면 required 가 붙은 항목이 보인다 이 부분은 반드시 post를 할때 필요한 부분이므로 잘 파악하도록 하자
Request Body
post에서 request body는 익숙할 것이다 보통 json을 통해서 전달하는데
{
	id:1,
    title:test_title
}
위와 같은 방식으로 많이 연습해 보았을 것이다.
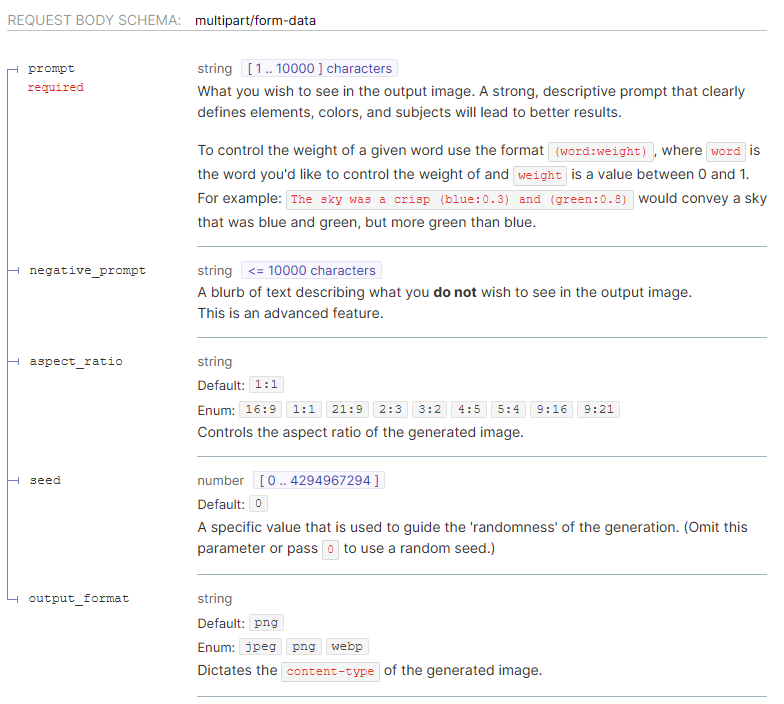
자 이제 필요한 내용들은 위에서 숙지했다 한번 FastAPI로 restapi를 구현해 보자
FastAPI
이 글에서는 venv와 fastapi를 설치하는 과정은 건너 뛰겠다.
fastapi 프로젝트 main.py파일에서 코드를 작성하자
외부 API를 쓰기 위해서 필요한 것은
- 외부 API를 제공하는 사이트에서 개인에게 할당한 secret key
- request body 와 request header의 내용
- 외부 API를 제공하는 URL 주소
위 3가지를 꼭 기억하고 코드를 작성하자
from fastapi import FastAPI, HTTPException, Form
import requests


app = FastAPI()

STABILITY_API_KEY = "your secret key" #사이트 회원가입시 발급해준다.

@app.post("/generate-image/")
async def generate_image(
    prompt: str = Form(...),  # Required prompt field
    negative_prompt: str = Form(None),  # Optional negative prompt
    aspect_ratio: str = Form("1:1"),  # Optional aspect ratio with default 1:1
    seed: int = Form(0),  # Optional seed with default 0
    output_format: str = Form("png"),  # Optional output format, default is png
):
    # Stability AI endpoint
    url = "https://api.stability.ai/v2beta/stable-image/generate/sd3"

    # Prepare headers for the request
    headers = {
        "authorization": f"Bearer {STABILITY_API_KEY}",
        "accept": "image/*",  # Or application/json if you want the base64 image
    }

    # Data for the request
    data = {
        "prompt": prompt,
        "output_format": output_format,
        "aspect_ratio": aspect_ratio,
        "seed": seed,
    }

    # Include negative prompt if provided
    if negative_prompt:
        data["negative_prompt"] = negative_prompt

    try:
        # Sending the request to the Stability AI API
        response = requests.post(url, headers=headers, data=data)

        if response.status_code == 200:
            # Save the image to a file
            filename = f"./generated_image.{output_format}"
            with open(filename, "wb") as file:
                file.write(response.content)

            return {"message": f"Image successfully generated and saved as {filename}"}
        else:
            return {"error": response.json()}

    except Exception as e:
        raise HTTPException(status_code=500, detail=str(e))
각각의 코드 블럭을 나누어 설명하겠다.
1. FastAPI endpoint
우선 fastapi를 통해 접근할 endpoint (url)을 만들어 보자
@app.post("/generate-image/")
async def generate_image(
    prompt: str = Form(...),  # Required prompt field
    negative_prompt: str = Form(None),  # Optional negative prompt
    aspect_ratio: str = Form("1:1"),  # Optional aspect ratio with default 1:1
    seed: int = Form(0),  # Optional seed with default 0
    output_format: str = Form("png"),  # Optional output format, default is png
):
위의 Request body에서 요구한 5가지의 내용이 parameter로 들어간다
2. Stability AI endpoint
위에서 fastapi의 endpoint를 정의했다면 이제 stability AI 사이트에서 제공하는 url로 우리의 fastapi의 post내용을 보내는 endpoint를 작성해야 한다.
- url을 통해 stability 사이트가 지정해준 url을 변수지정한다
- request headers에 꼭 들어갈 내용을 정의한다 이때 개인의 api key를 사용해서 stability 사이트의 인증을 해줄수 있도록한다.
- data에는 fastapi의 post에서 전달할 request body의 내용을 json으로 담자
    # Stability AI endpoint
    url = "https://api.stability.ai/v2beta/stable-image/generate/sd3"

    # Prepare headers for the request
    headers = {
        "authorization": f"Bearer {STABILITY_API_KEY}",
        "accept": "image/*",  # Or application/json if you want the base64 image
    }

    # Data for the request
    data = {
        "prompt": prompt,
        "output_format": output_format,
        "aspect_ratio": aspect_ratio,
        "seed": seed,
    }

    # Include negative prompt if provided
    if negative_prompt:
        data["negative_prompt"] = negative_prompt
3. Request Post
requests 라이브러리를 통해 stability가 제공하는 api를 이용하기 위한 정보를 보낸다
- requests가 도착할 url
- headers에 대한 정보
- json의 body 가 될 data
try except를 통해 status에 따른 결과를 받을 수 있도록 하자
try:
        # Sending the request to the Stability AI API
        response = requests.post(url, headers=headers, data=data)

        if response.status_code == 200:
            # Save the image to a file
            filename = f"./generated_image.{output_format}"
            with open(filename, "wb") as file:
                file.write(response.content)

            return {"message": f"Image successfully generated and saved as {filename}"}
        else:
            return {"error": response.json()}

except Exception as e:
        raise HTTPException(status_code=500, detail=str(e))
결과
이제 fastapi를 실행하고 127.0.0.1:port번호/docs로 들어가 보면 swagger로 만들어진 API docs를 볼 수 있을것이다.
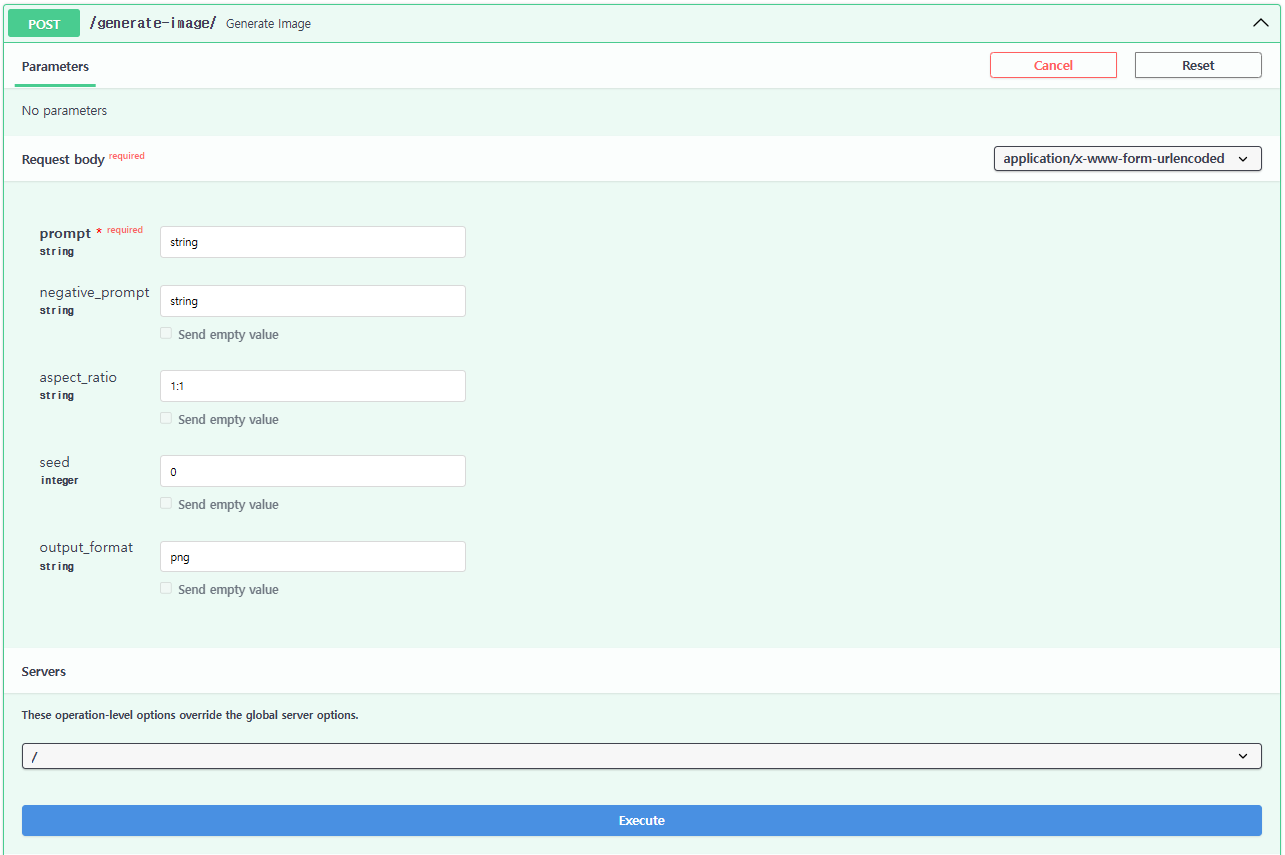
이제 prompt란에 자신이 원하는 프롬프트를 적으면 SD3모델을 이용한 이미지가 만들어 진다
아래는 prompt의 예시
dark high contrast render of a psychedelic tree of life illuminating dust in a mystical cave.
'python' 카테고리의 다른 글
| [FastAPI] restapi를 위한 코드 순서 (0) | 2024.09.26 |
|---|---|
| poetry add 혹은 pipenv install 무한로딩 (0) | 2024.05.08 |
| class 적응하기 2 (0) | 2024.01.30 |
| class 적응하기 1 (0) | 2024.01.30 |
| Class method vs Static method in python (2) | 2024.01.03 |